Mounting and Unmounting File Systems in Linux
Mounting and unmounting file systems are some of the most practical tasks you’ll perform in Linux. Whenever you add a new drive or rearrange your storage, you’ll need to mount it before you can access its contents.
When you mount a file system, you’re essentially linking it to a specific directory so you can access its contents. Unmounting, on the other hand, safely disconnects that link when you’re done or before removing the device.
In this guide, you’ll learn how to identify devices, create mount points, mount file systems with different options, and unmount them safely , step by step.
Mounting a File System
Mounting a file system in Linux is like unlocking a new room in your computer’s storage space. But before you can access that room, you need to find the door!
This involves a few steps that we’re going to consider in this section.
Identify the Device
The first step is to figure out which storage device you want to mount. This could be a new hard drive, a USB flash drive, or even a network-attached storage (NAS) device.
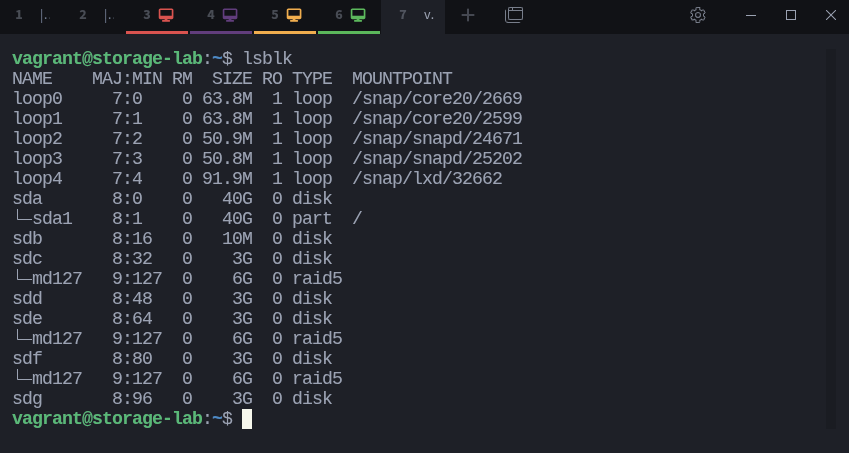
In Linux, we use the lsblk command to get a list of all the block devices connected to your system. You can think of block devices like individual storage units, each with its own name and capacity.
To see what’s available, simply type this in your terminal:
$ lsblkThis command will give you a tree-like view of your devices. You’ll see their names (like /dev/sda, /dev/sdb, etc.), their size, and if they’re already mounted, where they’re connected in your file system.
Create a Mount Point
Now that you’ve found your storage device, it’s time to designate a place within your existing file system where you’ll access its contents. This designated spot is called a mount point.
We can think of the mount point as a doorway. It’s a directory in your Linux system that acts as an entry point to the file system you want to mount. Once mounted, you’ll be able to browse the device’s files and folders as if they were part of your main file system, right there in that directory.
Creating a mount point is easy. You just need to make a new directory using the mkdir command. It’s a good practice to create mount points inside the /mnt directory, which is a standard location for temporary mounts in Linux.
For example, if you want to mount your device at /mnt/raid_data, you’d run this command in your terminal:
$ sudo mkdir /mnt/raid_dataHere’s what’s happening in the above command:
sudo: this gives you the superuser privileges needed to create a directory in the protected/mntdirectorymkdir: this is the command for creating new directories/mnt/raid_data: this is the path and name you choose for your new mount point directory
With your mount point ready, you’re one step closer to accessing your files!
Mount the File System
After you’ve found your device and prepared a mount point for it, the next step is to mount the file system. This is where you actually link the device’s contents to the mount point, making them accessible for use.
The mount command is the key player here. It’s like the final handshake that connects your device to the designated mount point directory.
Now, you can your device to /mnt/my_drive which you created earlier:
$ sudo mount /dev/md127 /mnt/raid_dataLet’s break it down:
mount: the command itself that tells the system to perform the mounting operation/dev/md127: this is the device you want to mount. In this case its a raid array./mnt/raid_datathis is the path to the directory (mount point) you created.
If everything goes smoothly, you won’t see any output in your terminal. But don’t worry, that’s a good sign. It means the mount was successful, and you can now navigate to /mnt/raid_data to access all the files and folders on your device.
Verify the Mount
After you’ve mounted a file system, you want to be sure it’s actually secure. Verifying a mount confirms that the device is properly connected to your chosen mount point and that you can access its content.
There are a couple of ways to do this:
1. Using mount | grep:
The mount command lists every file system currently mounted on your system. By combining it with grep, you can narrow the list to just the mount point you care about.
Let’s take a look at how to use it:
$ mount | grep /mnt/raid_dataIf the mount succeeded, you’ll see an output line similar to:
/dev/md127 on /mnt/raid_data type ext4 (rw,relatime,stripe=32)This tells you that the device /dev/md127 is mounted on /mnt/raid_data using the ext4 file system.
Sysxplore is an indie, reader-supported publication.
I break down complex technical concepts in a straightforward way, making them easy to grasp. A lot of research goes into every piece to ensure the information you read is as accurate and practical as possible.
To support my work, consider becoming a free or paid subscriber and join the growing community of tech professionals.
2. Using df -h:
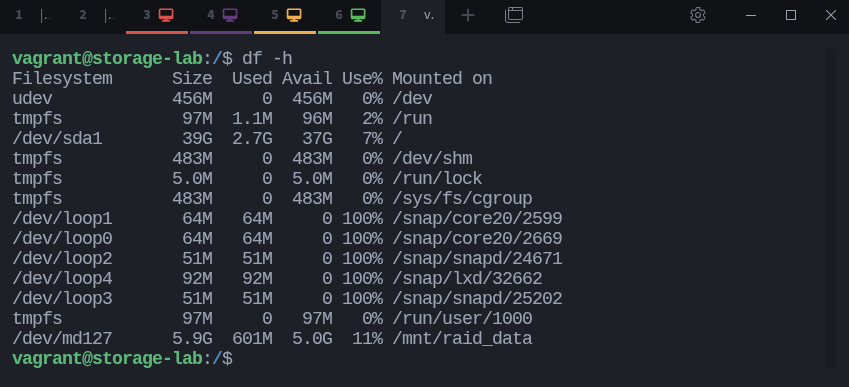
You can also verify the mount using df -h, which displays mounted file systems along with their disk usage in a human-readable format.
$ df -hHere, you can see that /dev/md127 is mounted on /mnt/raid_data and has 11% of storage usage.
Using findmnt command
You can also use the findmnt command, which provides a clearer, tree-like view of all mounted file systems. It’s particularly useful because it lets you directly query a specific mount point or device.
For example:
$ findmnt /mnt/raid_dataIf the mount is active, you’ll see output similar to:
This confirms that /dev/md127 is mounted on /mnt/raid_data and shows details about the file system type and mount options.
If you don’t see your mount point listed in either command’s output, the mount might have failed. Double-check the device name and the mount point path for typos, and make sure the device has been formatted with a file system that Linux recognizes.
Mounting with Options
The basic mount command we’ve used so far gets the job done, but sometimes you need more control over how a file system is mounted. That’s where mount options come in.
These are special flags you can add to the mount command to customize how the file system behaves. For example, you might want to mount a drive in read-only mode to prevent accidental changes.
To use mount options, you’ll add the -o flag followed by a comma-separated list of options to your mount command.
Here’s an example of mounting a device in read-only mode:
$ sudo mount -o ro /dev/md127 /mnt/raid_dataIn this command:
-o: specifies the options to usero: stands for read-only, meaning the file system will be mounted without write permissions/dev/md127: is the device name (replacemd127with your device identifier)/mnt/raid_datais the directory where the file system will be mounted
There are many other mount options available, such as:
rw: mount the file system in read-write mode (the default)exec: allow execution of binaries on the file systemnoexec: prevent execution of binariesuid=1000: set the owner of all files on the file system to user ID 1000gid=1000: set the group of all files on the file system to group ID 1000
You can combine multiple options by separating them with commas:
$ sudo mount -o ro,noexec,uid=1000 /dev/sdX1 /mnt/my_driveAnother useful option is mounting by UUID (Universally Unique Identifier), which is a more reliable way to identify devices than traditional device names.
Permanent Mounting - /etc/fstab
For file systems that need to be mounted automatically at boot time, you can use the /etc/fstab file. This file contains a list of file systems and their mount points, along with options and other parameters.
By configuring /etc/fstab, you ensure that your file systems are mounted consistently every time your system starts.
The /etc/fstab file is a plain text file that you can edit with any text editor. Each line in the file describes a file system and includes the following fields:
Device: The identifier of the device (e.g.,
/dev/md127or UUID).Mount Point: The directory where the file system will be mounted (e.g.,
/mnt/raid_data).File System Type: The type of file system (e.g.,
ext4,ntfs).Options: Mount options (e.g.,
defaults,ro,noatime).Dump: Used by the
dumpcommand to determine whether the file system needs to be dumped (0 or 1).Pass: Determines the order in which file systems are checked at boot (0 to disable checking).
For example, here is an entry for /etc/fstab to mount /dev/md127 at /mnt/raid_data with default options:
/dev/md127 /mnt/raid_data ext4 defaults,usrquota,grpquota,prjquota 0 2To add this entry to /etc/fstab, you would open the file with a text editor and append the line:
$ sudo nano /etc/fstabFor more information on configuring /etc/fstab, you can refer to Linux fstab options and NFS mount.
Unmounting a File System
Unmounting a file system is an important step when you need to disconnect a storage device safely or before removing it from the system. This process ensures that all data is properly writtenMounting and Unmounting File Systems in Linux to the device and prevents data corruption.
In this section, we will cover the steps to unmount a file system safely.
Ensure No Processes Are Using the File System
Before unmounting a file system, you need to ensure that no processes are actively using it. This can be done using the lsof command, which lists open files and the processes that are using them:
$ sudo lsof /mnt/raid_dataIf the output is empty, it means no processes are currently using the file system, and you can proceed with unmounting.
However, if the output lists any processes, you’ll need to close them before unmounting.
In addition, the lsof command might not always show all processes using a mount point. If you’re having trouble unmounting and suspect a process is still using the file system, refer to this guide on how to troubleshoot the target is busy error.
Unmount the File System
Once you have ensured that no processes are using the file system, you can proceed to unmount it using the umount command.
$ sudo umount /mnt/raid_dataAfter the command is executed and the file system is successfully unmounted. The contents of the device /dev/md127 are no longer accessible from the directory /mnt/raid_data.
To verify that the file system has been unmounted, you can use the lsblk command or check the mount point directory to ensure it is empty.
Thanks for reading!
If you enjoyed this content, don’t forget to leave a like ❤️ and subscribe to get more posts like this every week.


