

By this point, we’ve already seen how SSH can forward traffic to a specific port or even through another internal host. Let’s now look at the last type of SSH tunnel: dynamic port forwarding. Dynamic forwarding builds on those ideas, but removes the need to decide the destination upfront.
Instead of forwarding one specific port to one specific service, dynamic port forwarding turns SSH into a local proxy that can carry any TCP traffic through the connection. Because of this flexibility, an SSH session using dynamic forwarding can behave almost like a lightweight, application-level VPN.
The idea is simple: SSH opens a SOCKS5 proxy on your machine. Any application that knows how to use a SOCKS proxy, web browsers, package managers, command-line tools, can send their traffic into it. SSH then decides where that traffic should go based on the requests coming from the application. It’s the application, not the tunnel, that chooses the final destination.
You will often see dynamic port forwarding used for web browsing. By routing your browser’s traffic through an SSH tunnel, you can make it appear as if you’re browsing from the SSH server’s network. This is useful for accessing geo-restricted content, bypassing local network filters, or simply adding an extra layer of encryption to your web traffic.
To see this behavior clearly, we’ll recreate a situation where normal internet access is blocked and then use dynamic forwarding to work around it.
Lab Setup
For this scenario, we can reuse our local ssh tunnel lab setup, so we have:
The client machine (192.168.60.10) where I’ll run my SSH command and open the tunnel.
The webserver server (192.168.60.11 ) that I can connect to via SSH.
Instead of keeping this abstract, the diagram below shows how dynamic port forwarding works end to end, from the local SOCKS proxy to the SSH server and out to the destination requested by the application.
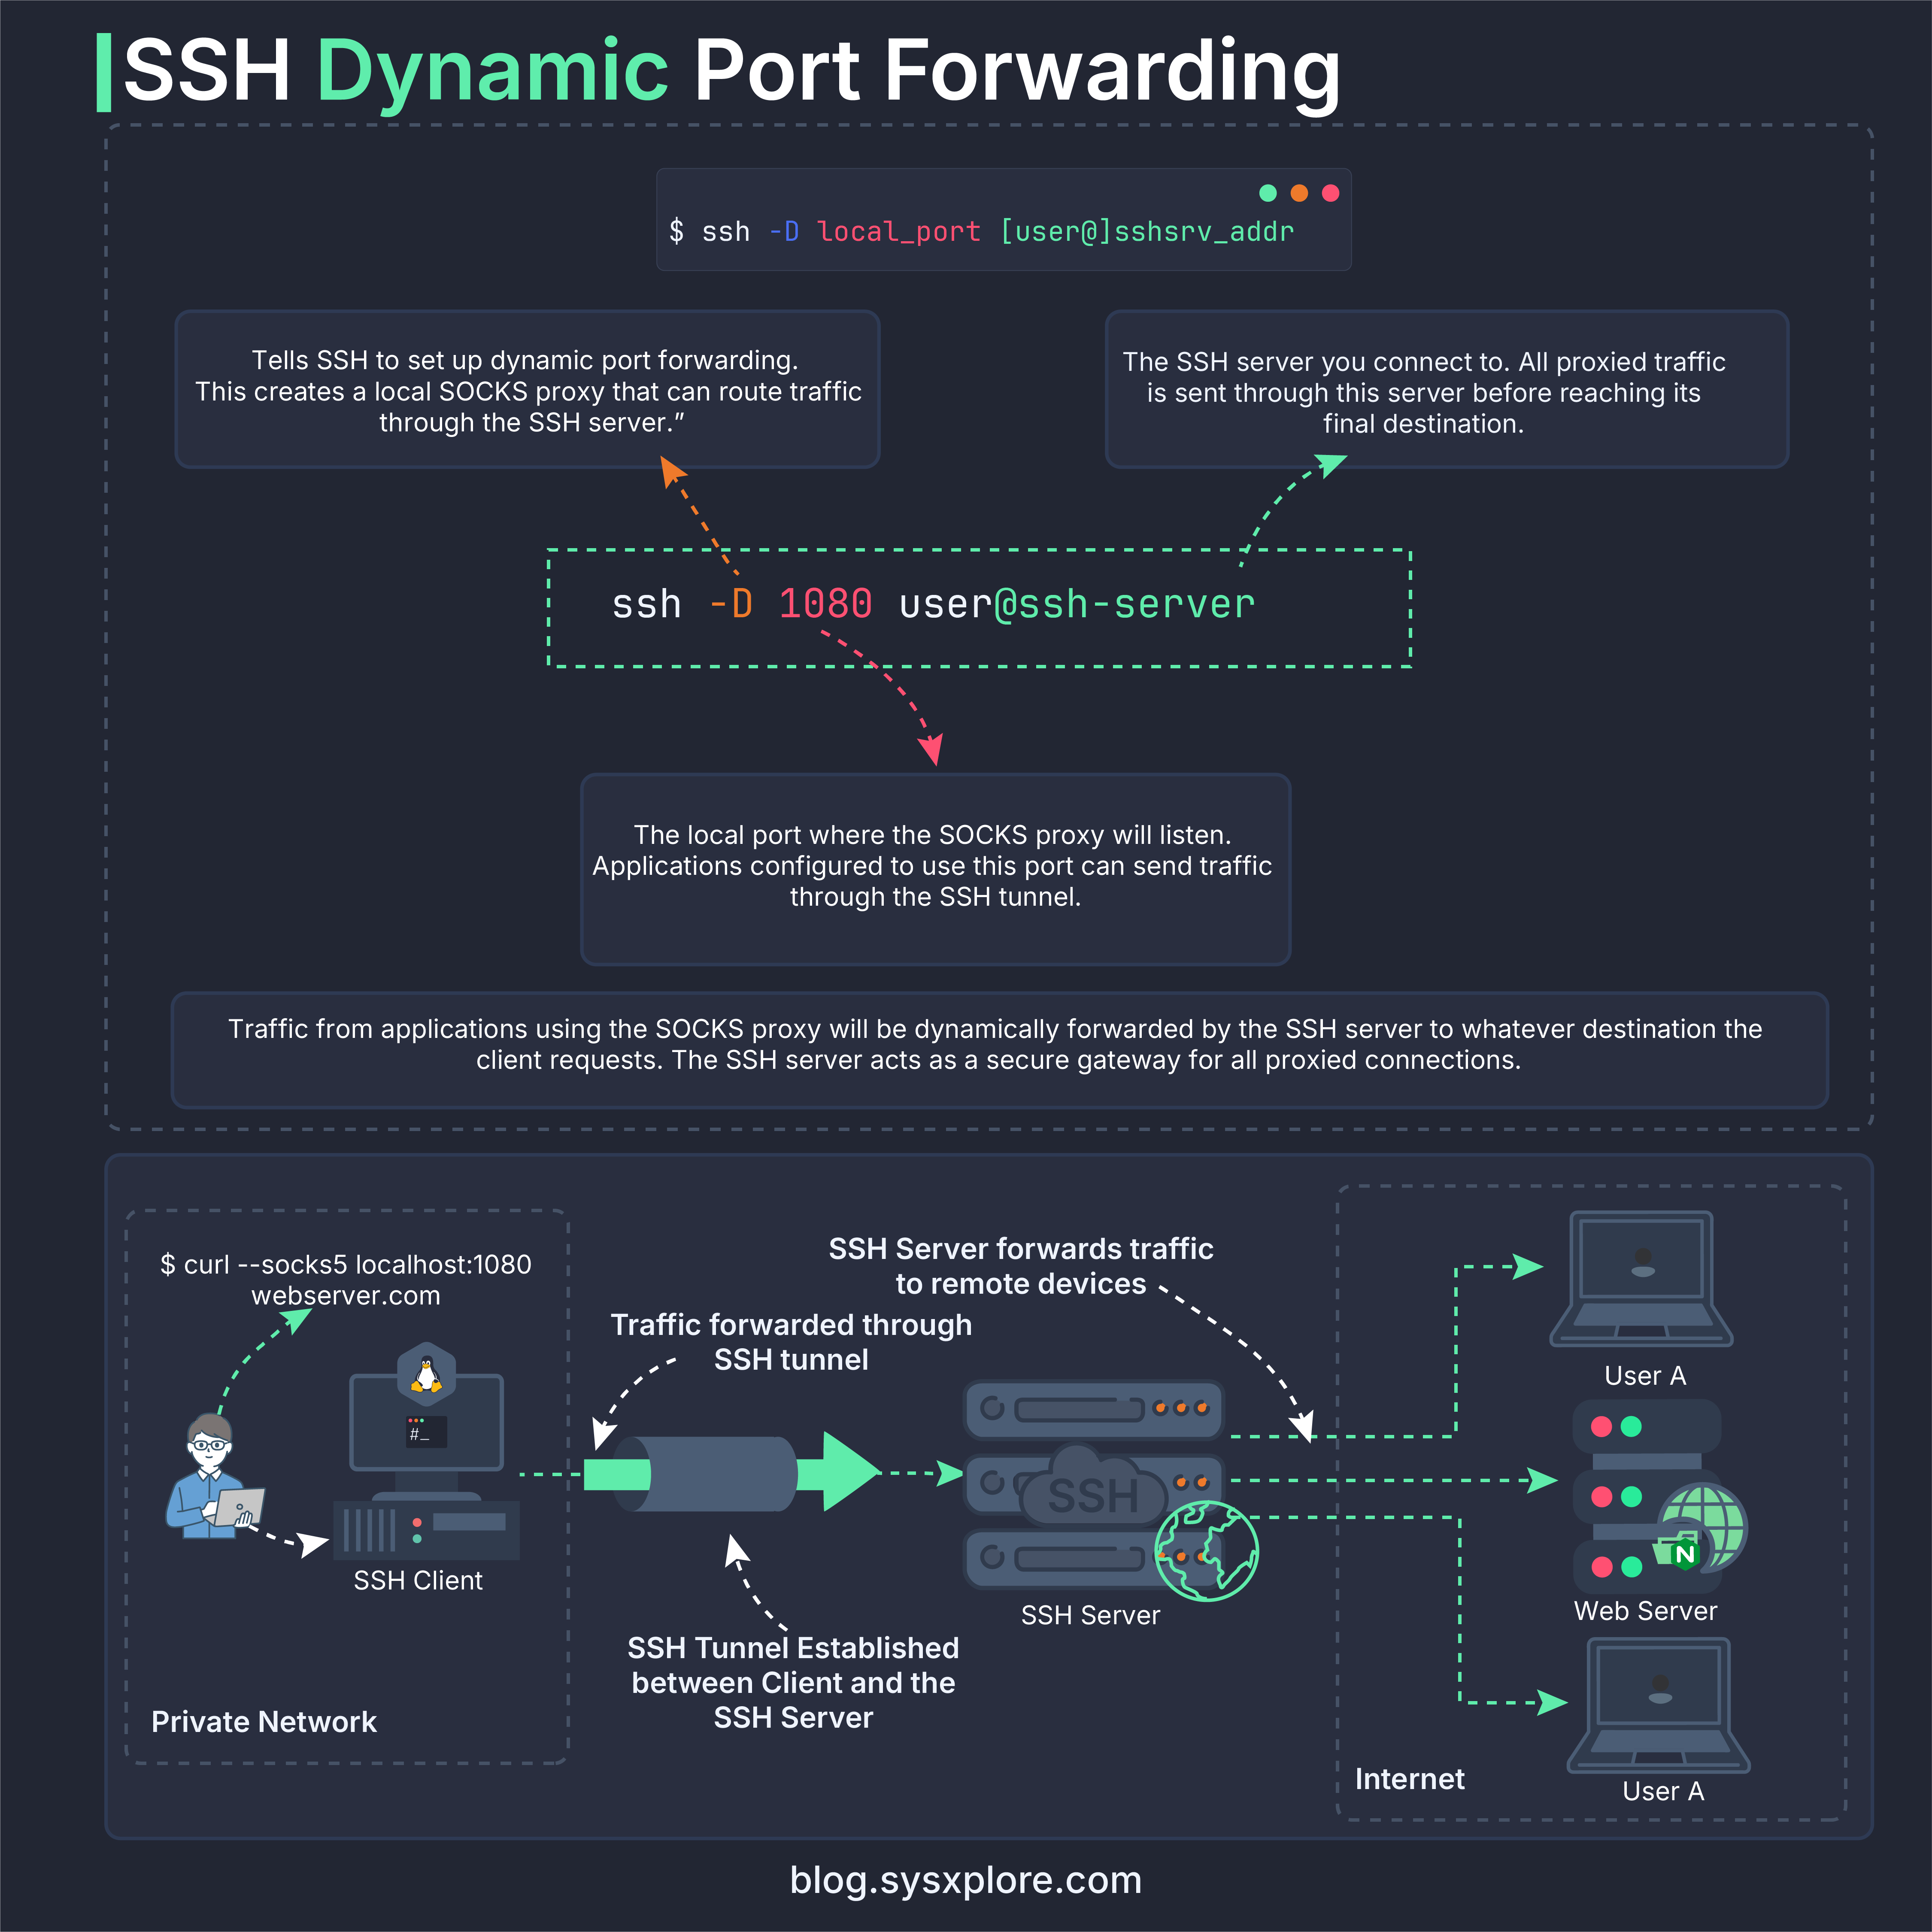
NOTE:
If you skipped the first part or haven’t set up the lab yet, the GitHub repository includes the full setup so you can start from here.
Simulating a Network Restriction
But first let’s do some house cleaning and disable the firewall on the webserver so that we don’t have any issues when testing the dynamic tunnel.
This ensures that any failure we see comes from the client side restrictions, not from the SSH server itself. So, on the webserver run:
$ sudo ufw disable
With the server ready, we can now introduce the real problem dynamic forwarding is meant to solve.
Now let’s pretend that our ISP is blocking access us from accessing websites, so if we try to curl google.com from the client machine, it will fail, to simulate that, we can configure a firewall to block all outgoing http and https traffic on the client machine:
$  sudo ufw deny out 443
$  sudo ufw deny out 80

$ sudo ufw allow ssh

$ sudo ufw enable

$ sudo ufw status
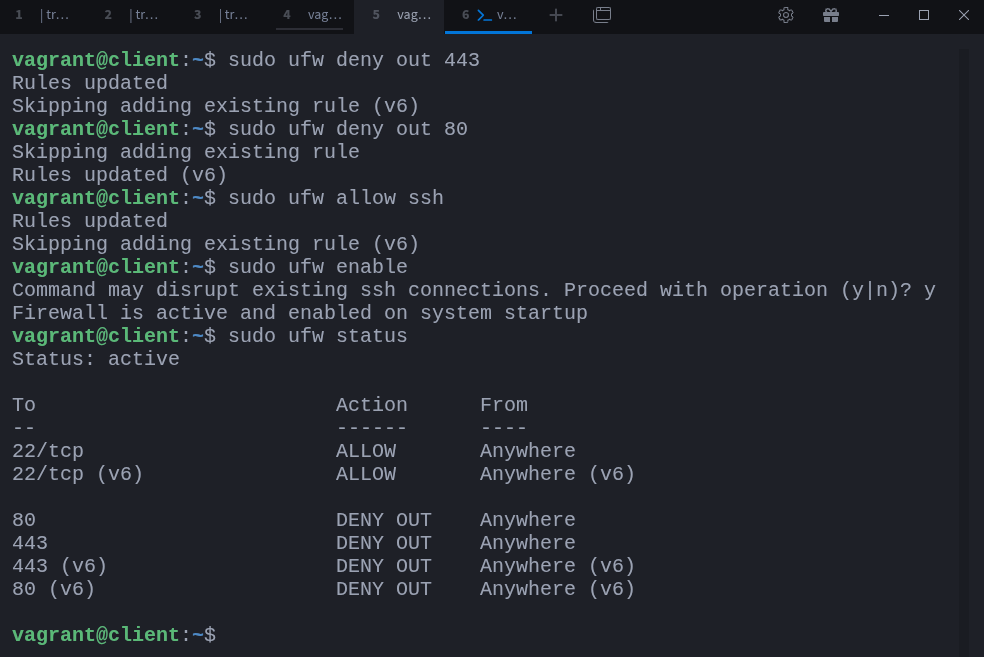
Our firewall is now blocking all outgoing http and https traffic. Let’s confirm that by trying to curl google.com from the client machine:
$ curl --max-time 5 http://www.google.com
As expected it failed.
At this point, the client machine has no direct path to the web, which makes it a perfect candidate for a dynamic SSH tunnel.
Creating the Dynamic SSH Tunnel
To bypass this restriction, SSH needs to listen locally and behave like a SOCKS proxy. That’s exactly what dynamic port forwarding does.
$ ssh -D user@ssh_serverThis tells SSH to open a SOCKS5 proxy on .
A common choice is port 1080. To establish the dynamic tunnel, run the following command on the client machine:
$ ssh -N -D 1080 vagrant@webserverAfter running this command, your laptop now has a proxy available at:
localhost:1080Any application configured to use that proxy will send its traffic through the SSH connection to 192.168.60.11 (webserver), and from there out to the internet, or to whatever networks the SSH server can reach.
From SSH’s point of view, it’s no longer forwarding traffic to a single destination, it’s forwarding requests.
Testing the SOCKS Proxy
Instead of reconfiguring a browser, we’ll use curl so we can see the effect directly from the command line.
Let’s test out this out.
We can tell curl to use the SOCKS5 proxy at localhost:1080 like this:
$ curl --socks5 localhost:1080 http://www.google.com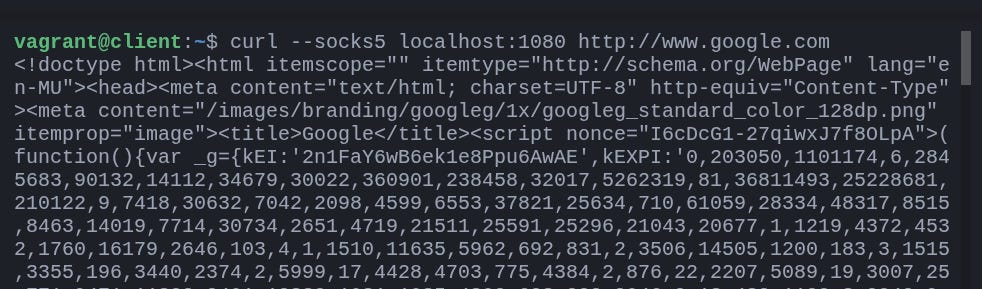
And voila! We have successfully accessed google.com through the dynamic SSH tunnel. The traffic was routed from our curl command to the SOCKS5 proxy at localhost:1080, then through the SSH connection to the webserver, and finally out to the internet.
What Makes Dynamic Forwarding Different?
Now that we’ve seen it working, it’s worth stepping back and looking at what makes this type of tunnel fundamentally different from the others.
Unlike traditional port forwarding, which sends traffic to a single destination, dynamic forwarding is flexible. It adapts based on whatever the application is trying to reach, making it a powerful tool when dealing with filtered networks, restricted environments, or cases where you want a single encrypted path to carry multiple types of traffic at once.
As I mentioned earlier, dynamic port forwarding creates a SOCKS5 proxy on your local machine. Applications that support SOCKS proxies can send their traffic through this proxy, and SSH will forward that traffic to its intended destination based on the requests, but you have to explicitly configure the application to use the SOCKS5 proxy. If you want to route all your system’s traffic through the SSH tunnel, you would need to set up a system-wide proxy or use tools like Proxychains or Redsocks to redirect traffic through the SOCKS proxy. For system wide proxy simply go to your networks settings and configure the type of proxy you want to use, either http, https or socks5 (which ssh dynamic forwarding uses) and set the proxy address to localhost and port to 1080 (or whatever port you used when establishing the dynamic tunnel).
Choosing the Right Tunnel for Each Situation
All SSH tunnels use the same underlying mechanism, but the problem they solve depends entirely on where traffic needs to go and where it should appear to come from.
Once you’ve seen how each type of tunnel behaves, the real value comes from knowing when to use each one. All SSH tunnels rely on the same encrypted connection, but they solve very different problems depending on the direction of traffic and the layout of the network around you.
Local port forwarding fits naturally when you want to reach something hidden behind the SSH server. If the SSH server can see a service that you cannot, whether it’s a private database, an internal API, or another machine in a protected subnet, local forwarding gives your laptop a direct line to it. From your application’s perspective, the service appears to be running on your own machine, even though the SSH server is quietly handling all the forwarding work.
Remote port forwarding addresses the opposite scenario. Sometimes you’re running something locally, perhaps a development server or a support tool, that a remote system cannot reach because you’re behind NAT or a strict firewall. Opening a port on the remote machine and routing that traffic back to your laptop allows others to access your local service without you needing to expose it to the wider internet.
The SSH proxy tunnel extends the idea of local forwarding into networks with multiple layers. Instead of connecting only to the SSH server, your traffic continues deeper into another machine that only the SSH server can reach. This makes it perfect for environments with bastion hosts, internal-only services, or cloud networks where the public-facing server is deliberately isolated from the private systems behind it.
Dynamic forwarding takes a more general approach. Instead of targeting a single service, it acts as a flexible SOCKS proxy that applications can send any request through. If you want your traffic to originate from the SSH server’s network, or you need a simple way to move multiple types of application traffic through one encrypted path, dynamic forwarding becomes the most convenient choice.
Each tunnel follows a specific pattern, and once you understand what direction the traffic must move, and where it needs to appear to come from, picking the right method becomes straightforward.
Thanks for reading!
If you enjoyed this content, don’t forget to leave a comment, like ❤️ and subscribe to get more posts like this every week.
Your SSH series was too awesome dude. Please post similiar series like this!